Station Software
Version: 1.0.X
Last Updated: October 2025
This documentation covers the Amperry Kiosk application for powerbank rental stations. The kiosk runs on Linux/ARM devices and provides a full-screen interface for managing and renting powerbanks.
Getting Started
The kiosk software consists of:
- Main Kiosk Interface - Video playback with unlock functionality
- Settings Menu - Configuration and management interface
- Backend Services - Local API server for event management
Main Kiosk Interface
Purpose
The main interface displays promotional videos and allows users to unlock powerbanks. It operates in full-screen kiosk mode.
Key Features
- Video Playback: Loops promotional videos in the background
- Unlock Methods:
- QR Code Mode: Displays encrypted QR codes for online unlock
- Local Unlock Mode: Shows unlock button for offline operations
- Automatic Slot Monitoring: Continuously checks slot availability
- Cloud Sync: Synchronizes data with cloud backend when online
How to Use
For Users
- View Videos: The screen displays promotional content automatically
- Unlock Powerbank:
- Online Mode: Scan the QR code with your phone to receive an OTP, enter the code on the station
- Local Mode: Press the unlock button on screen to instantly unlock a powerbank
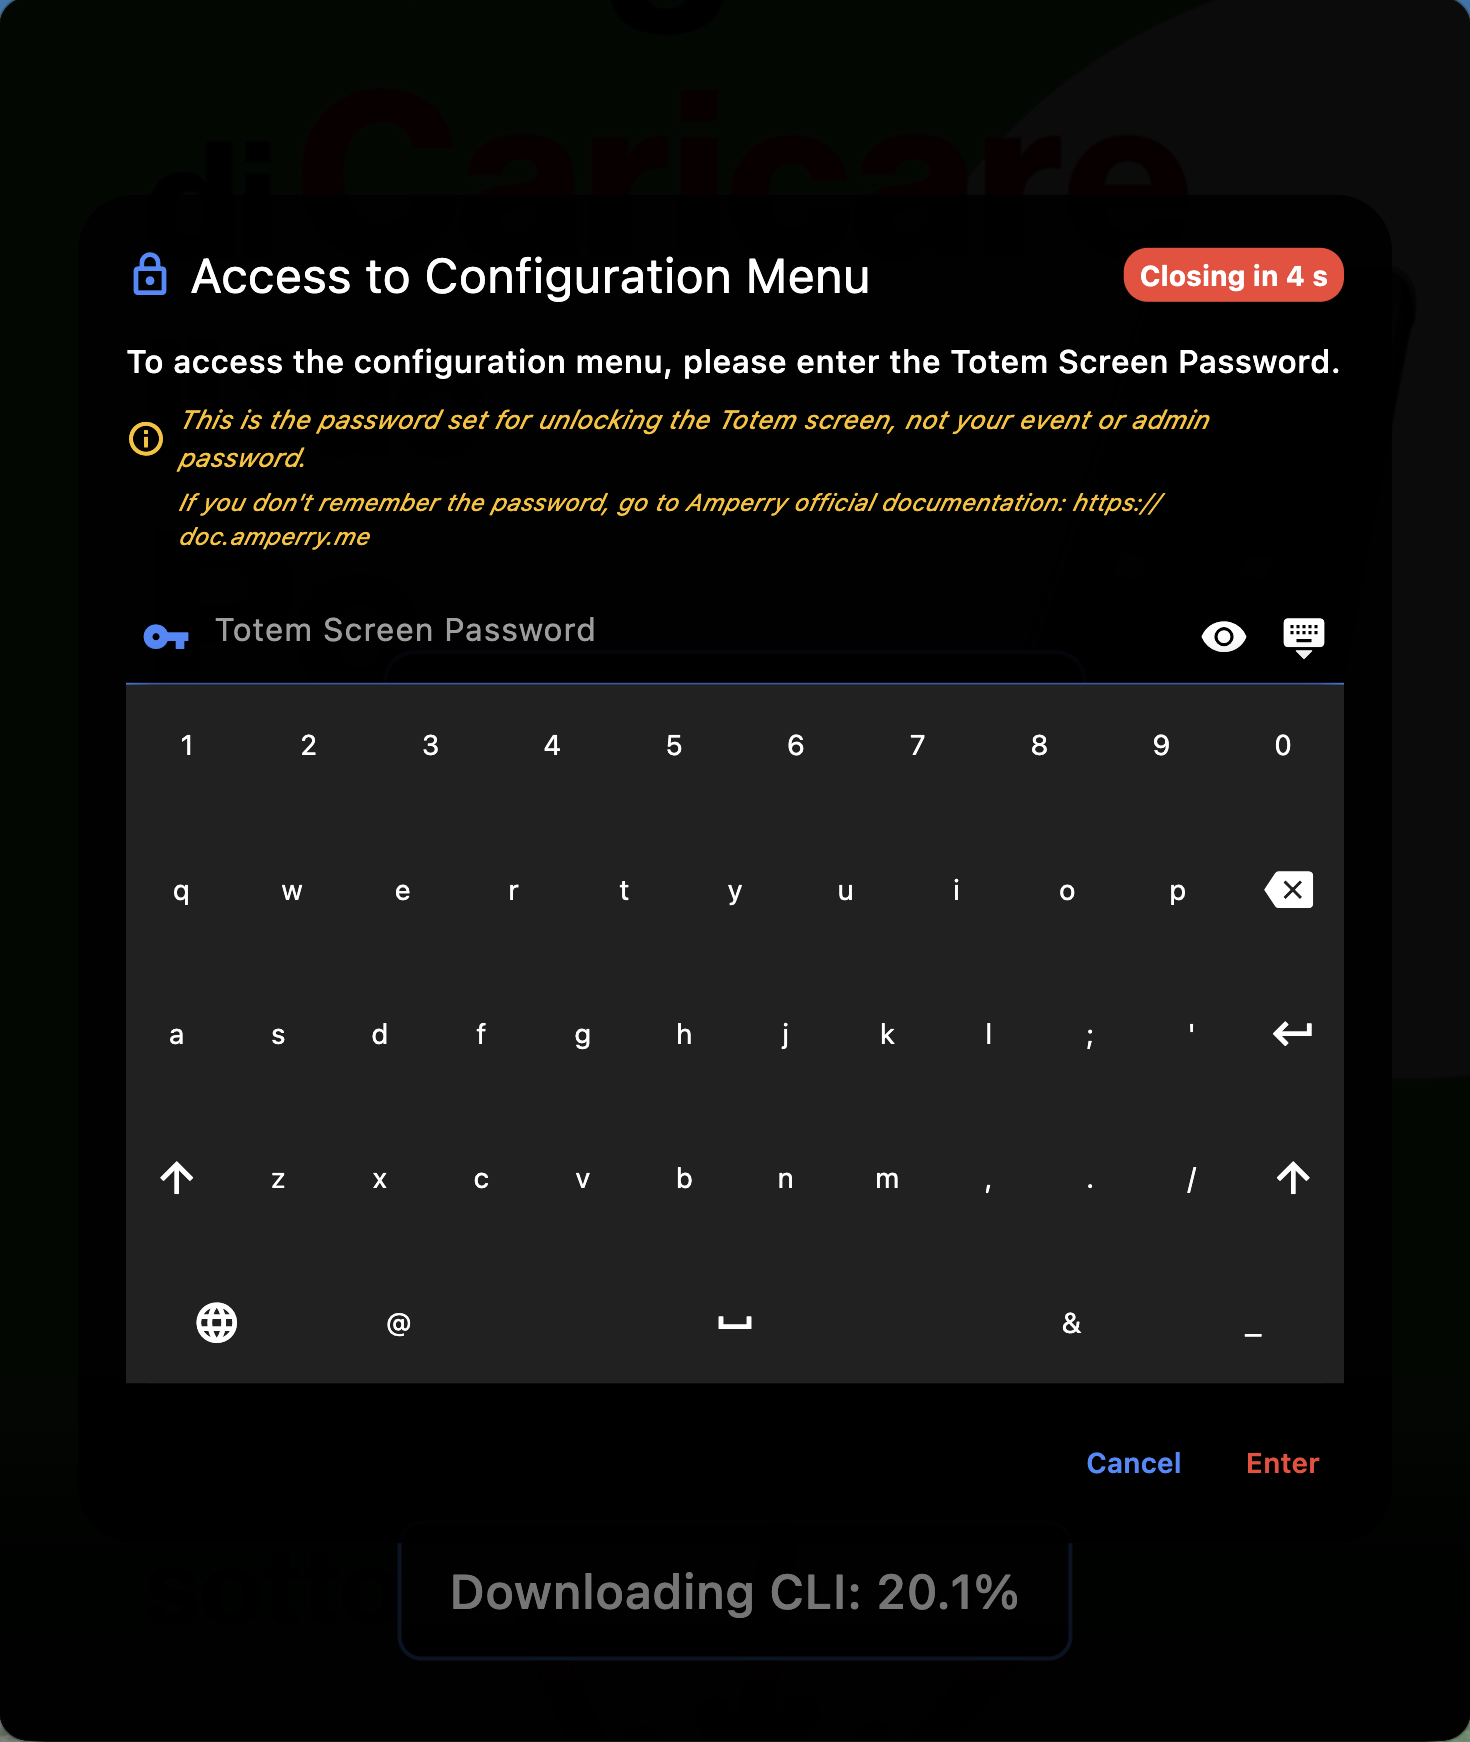
- Access Settings: Long press anywhere on the screen and enter the totem password
For Administrators
To Access Settings Menu:
- Long press on the kiosk screen
- Enter the totem password when prompted
- Navigate through different sections using the sidebar

WiFi Setup
Purpose
Configure WiFi internet connection for the station. Required for first-time setup to download software packages and configure the station.
How to Access
- Long press on the kiosk screen to open Settings Menu
- Enter the totem password when prompted
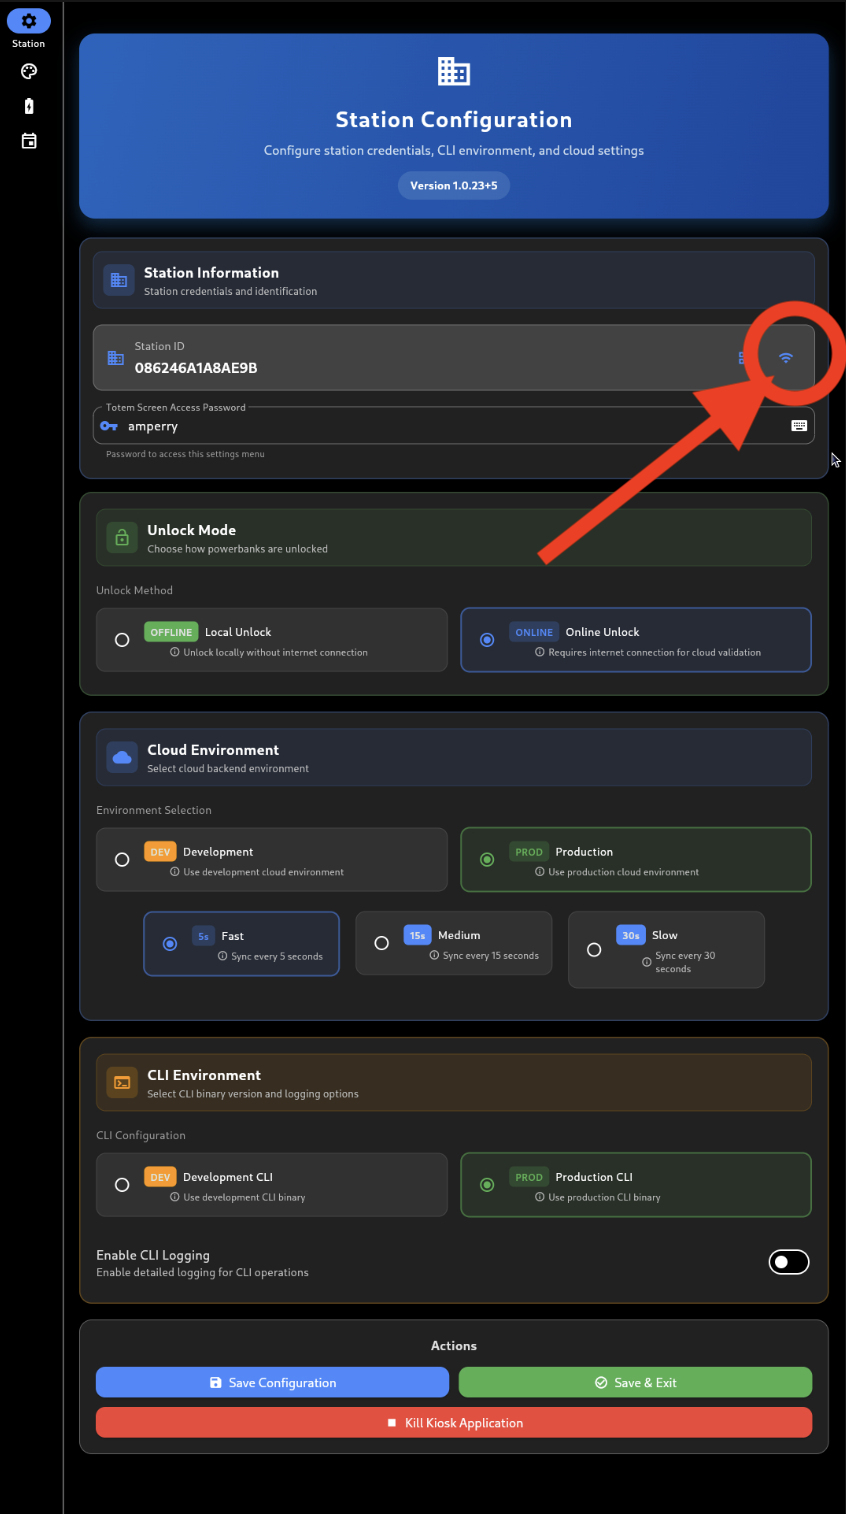
- Click the WiFi icon in the settings menu
- The WiFi setup dialog opens
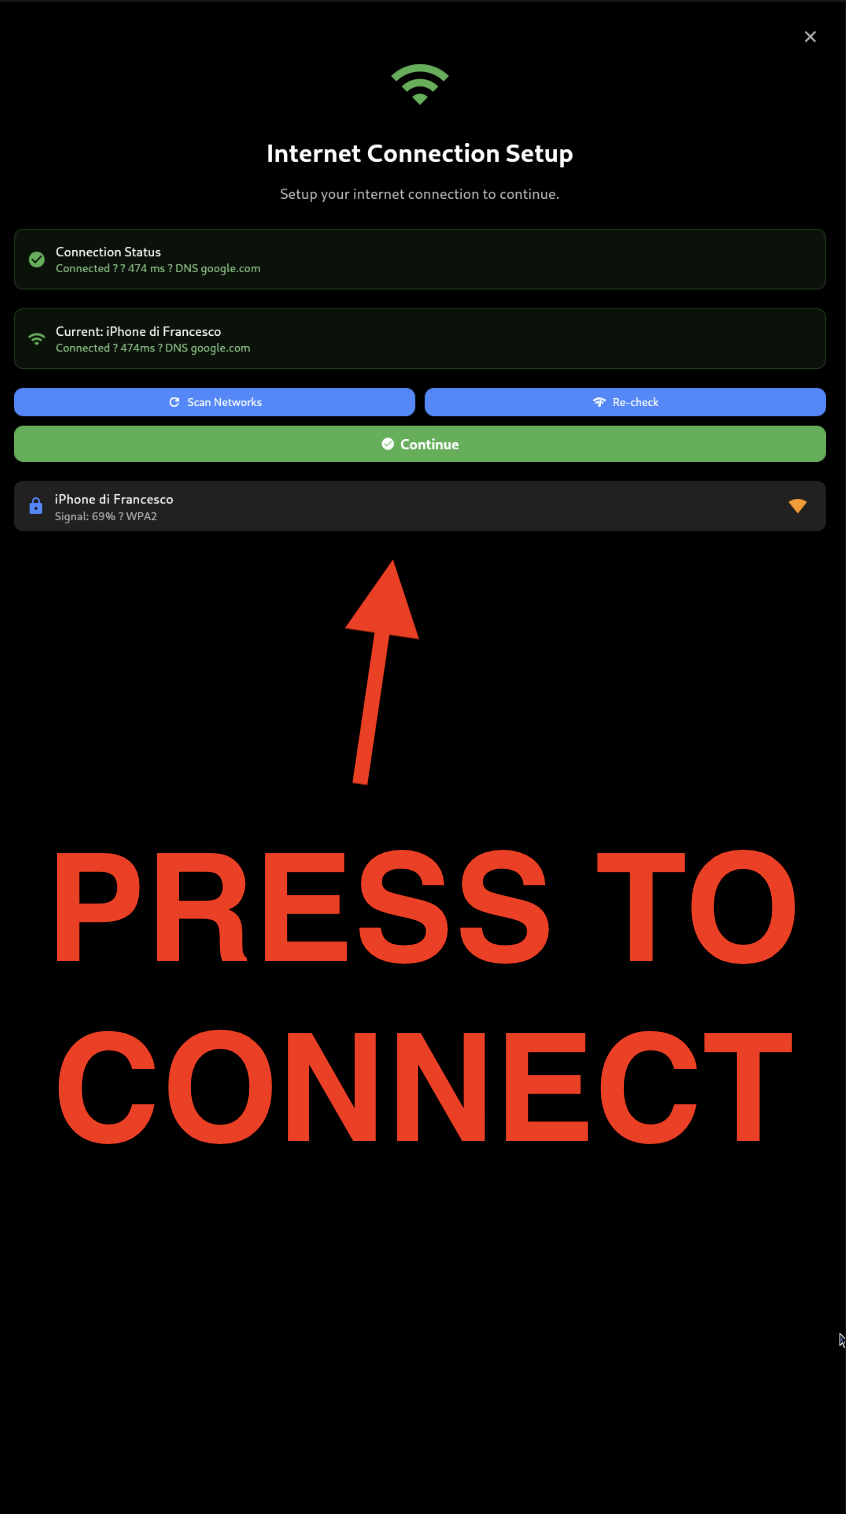
Connecting to WiFi
- Scan Networks: Available WiFi networks are automatically scanned and displayed
- Networks are sorted by signal strength (strongest first)
- Each network shows SSID, signal strength, and security type
- Select Network: Tap on a network from the list
- Enter Password: For secured networks, enter the WiFi password using the on-screen keyboard
- Connect: Click "Connect" to proceed
- A "Connecting..." dialog shows progress
- Connection is verified automatically
- Verify Connection: Use "Re-check" button to verify internet connectivity
- Shows current connection status and latency
- Updates UI to show green "Connected" status
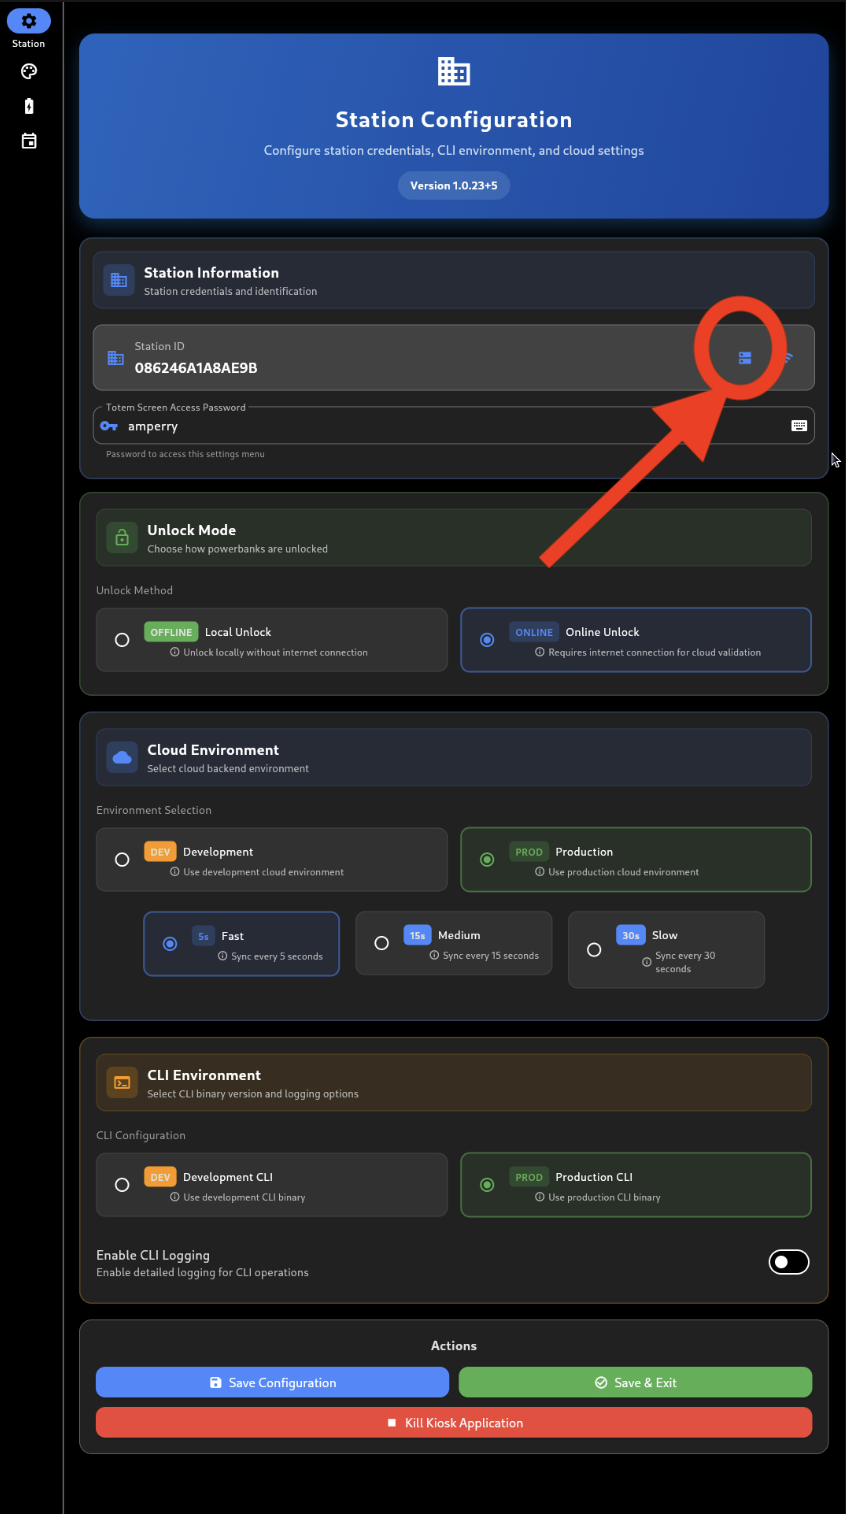
MAC Address Display
In WiFi Setup Dialog: MAC addresses are displayed in the setup dialog for network whitelisting purposes.
In Station Settings: MAC addresses are also available from Settings Menu → Station tab. The MAC Address field shows all network interface MAC addresses (e.g., wlan0, eth0).
Purpose: Some networks require MAC address whitelisting for access. Provide these MAC addresses to your network administrator.
Station Configuration
Purpose
Configure station credentials, unlock modes, and cloud settings.
Location
Settings Menu → Station (first tab)
Configuration Options
Station Information
- Station ID: Unique identifier for the station
- Station Password: Authentication password for backend
- Totem Password: Password to access settings menu
- MAC Address: View all network interface MAC addresses (also displayed in WiFi setup dialog)
Unlock Mode
- Local Unlock: Works offline, instantly unlocks powerbanks
- Online Unlock: Requires internet, displays QR codes for cloud validation

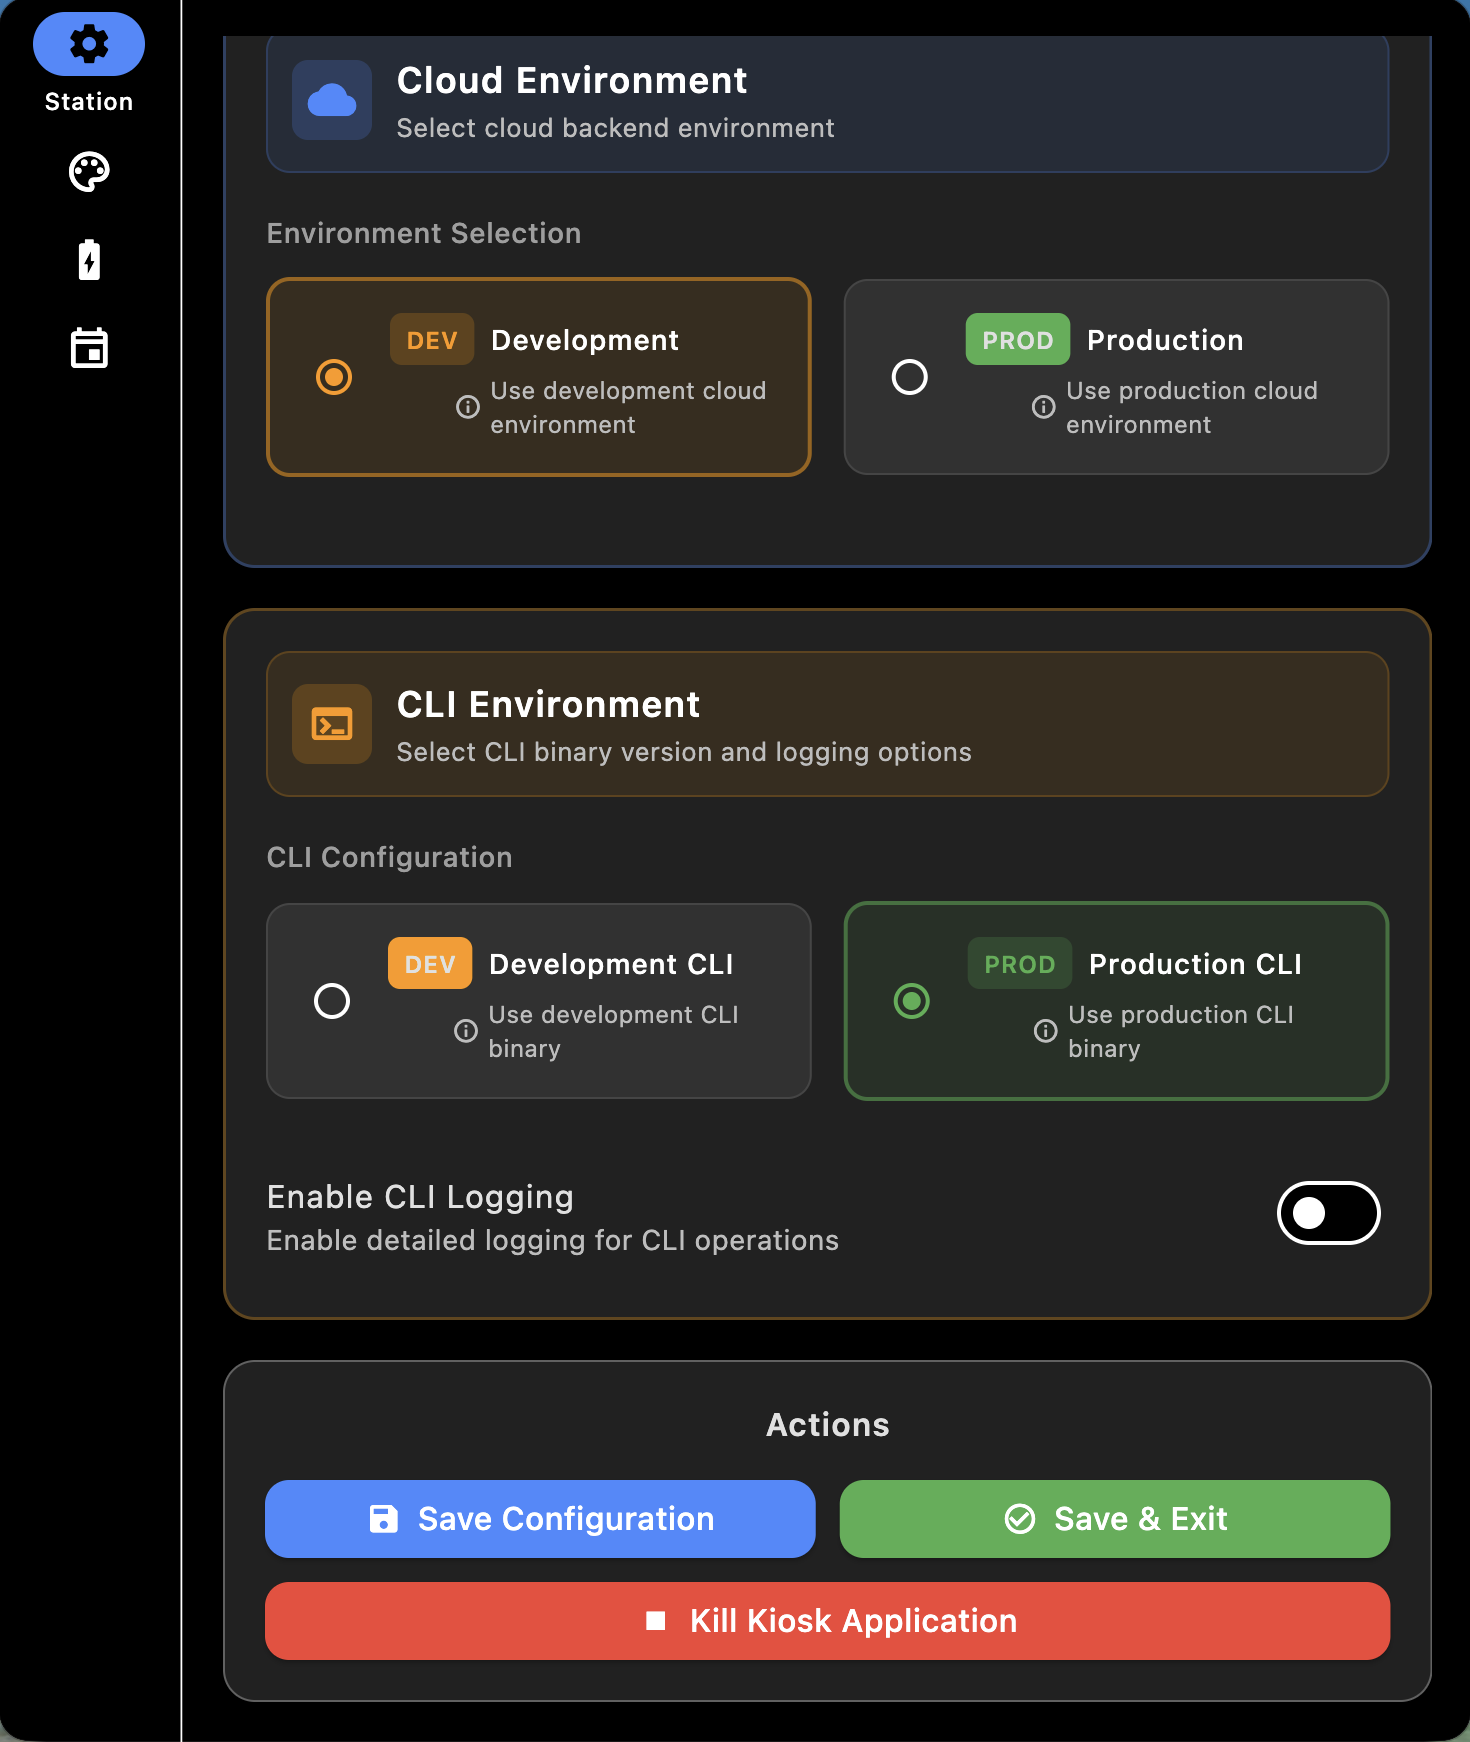
Cloud Environment
- Development: Connect to development cloud backend
- Production: Connect to production cloud backend
- Sync Interval: Choose sync frequency (30s, 60s, or 120s)
CLI Environment
- Development CLI: Use development CLI binary
- Production CLI: Use production CLI binary
- Enable Logging: Toggle detailed logging for debugging
Actions
- Save Configuration: Save changes without exiting
- Save & Exit: Save changes and return to kiosk
- Kill Application: Completely shutdown the kiosk
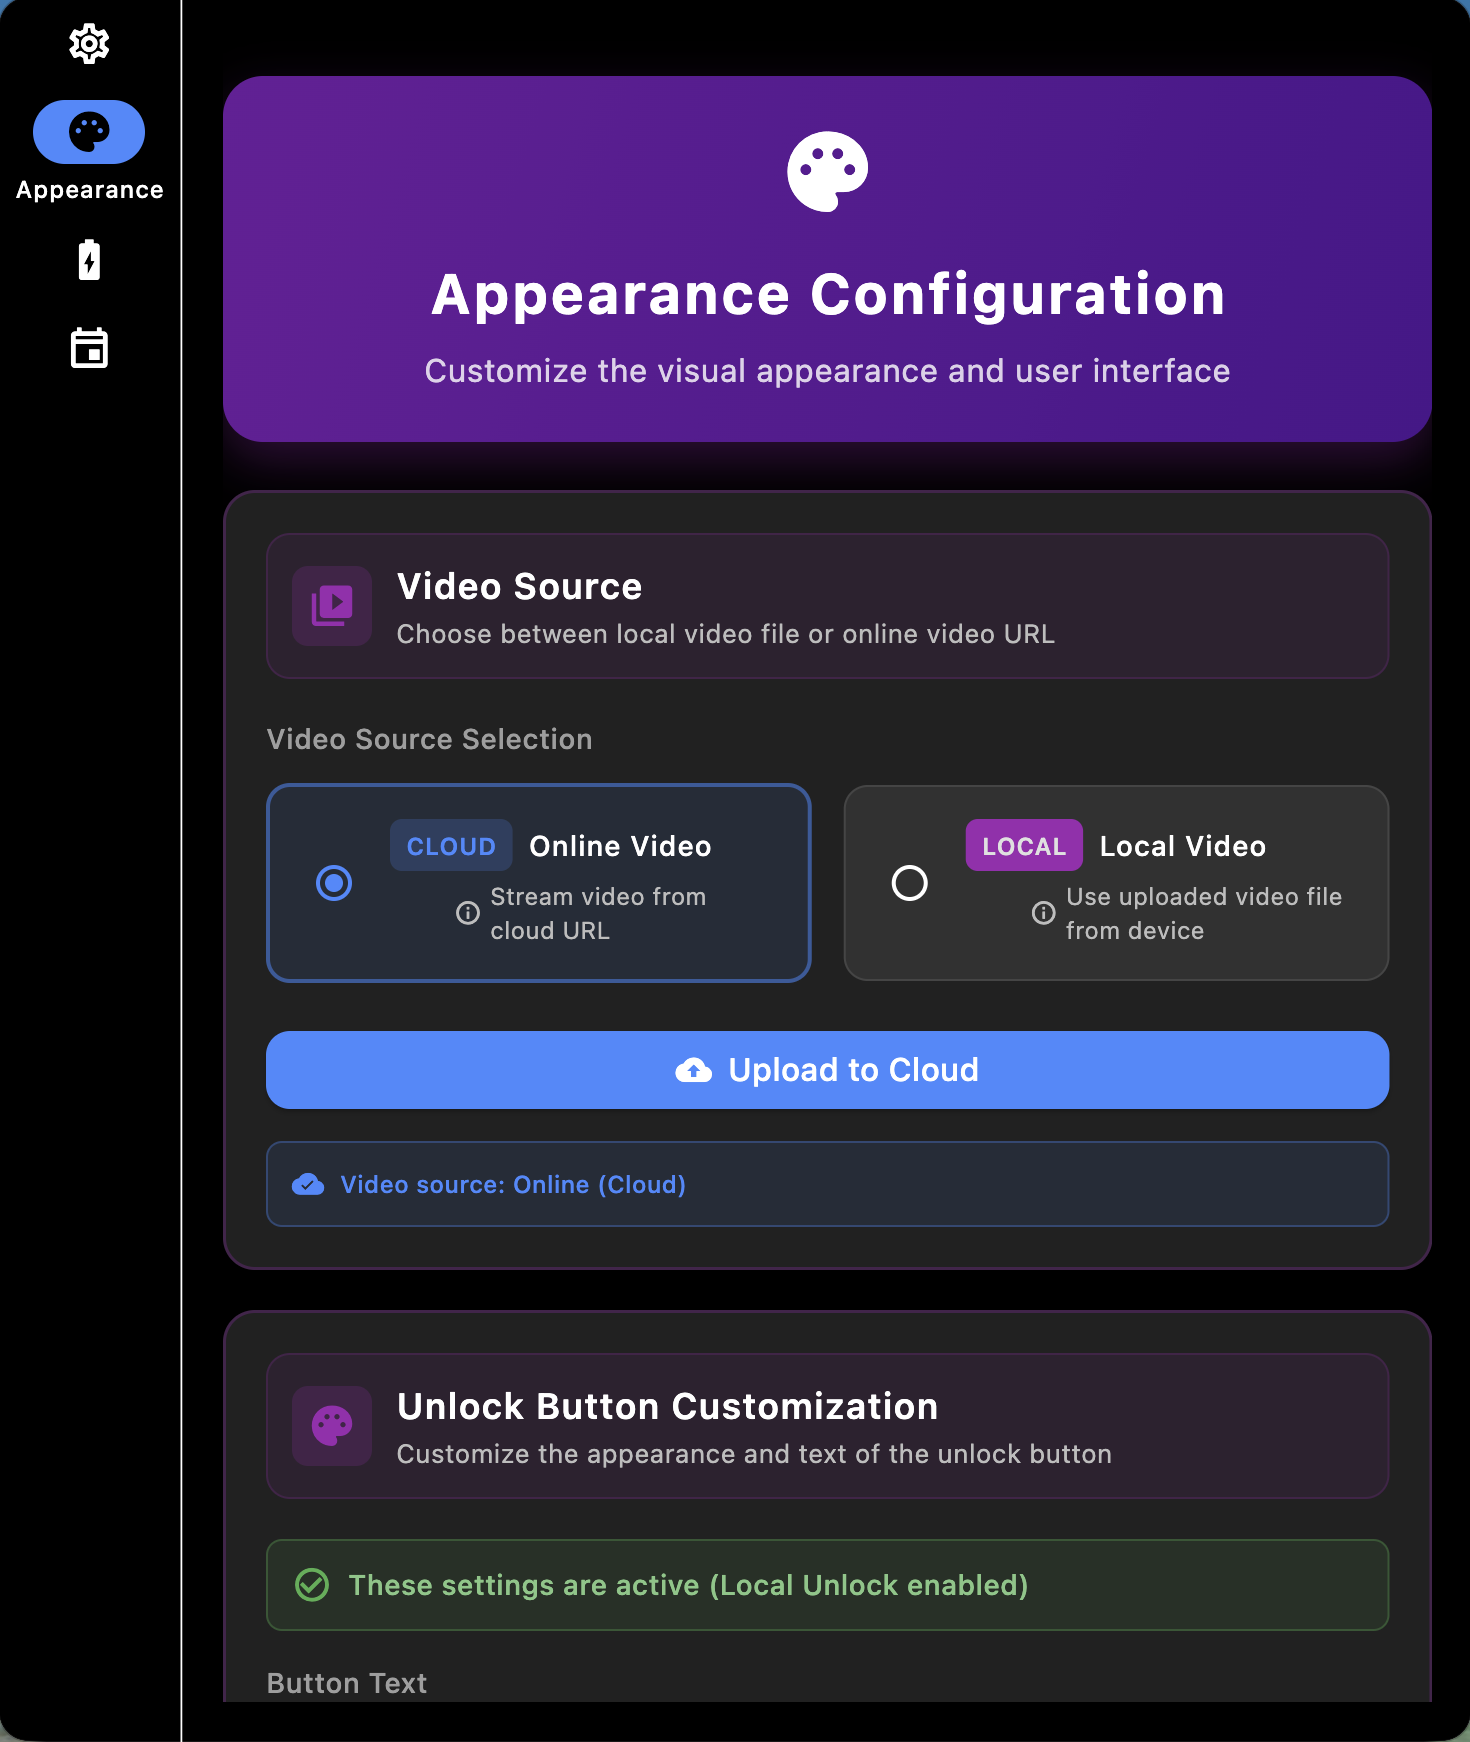
Appearance Configuration
Purpose
Customize visual appearance including video source and button styling.
Location
Settings Menu → Appearance (second tab)
Video Source
-
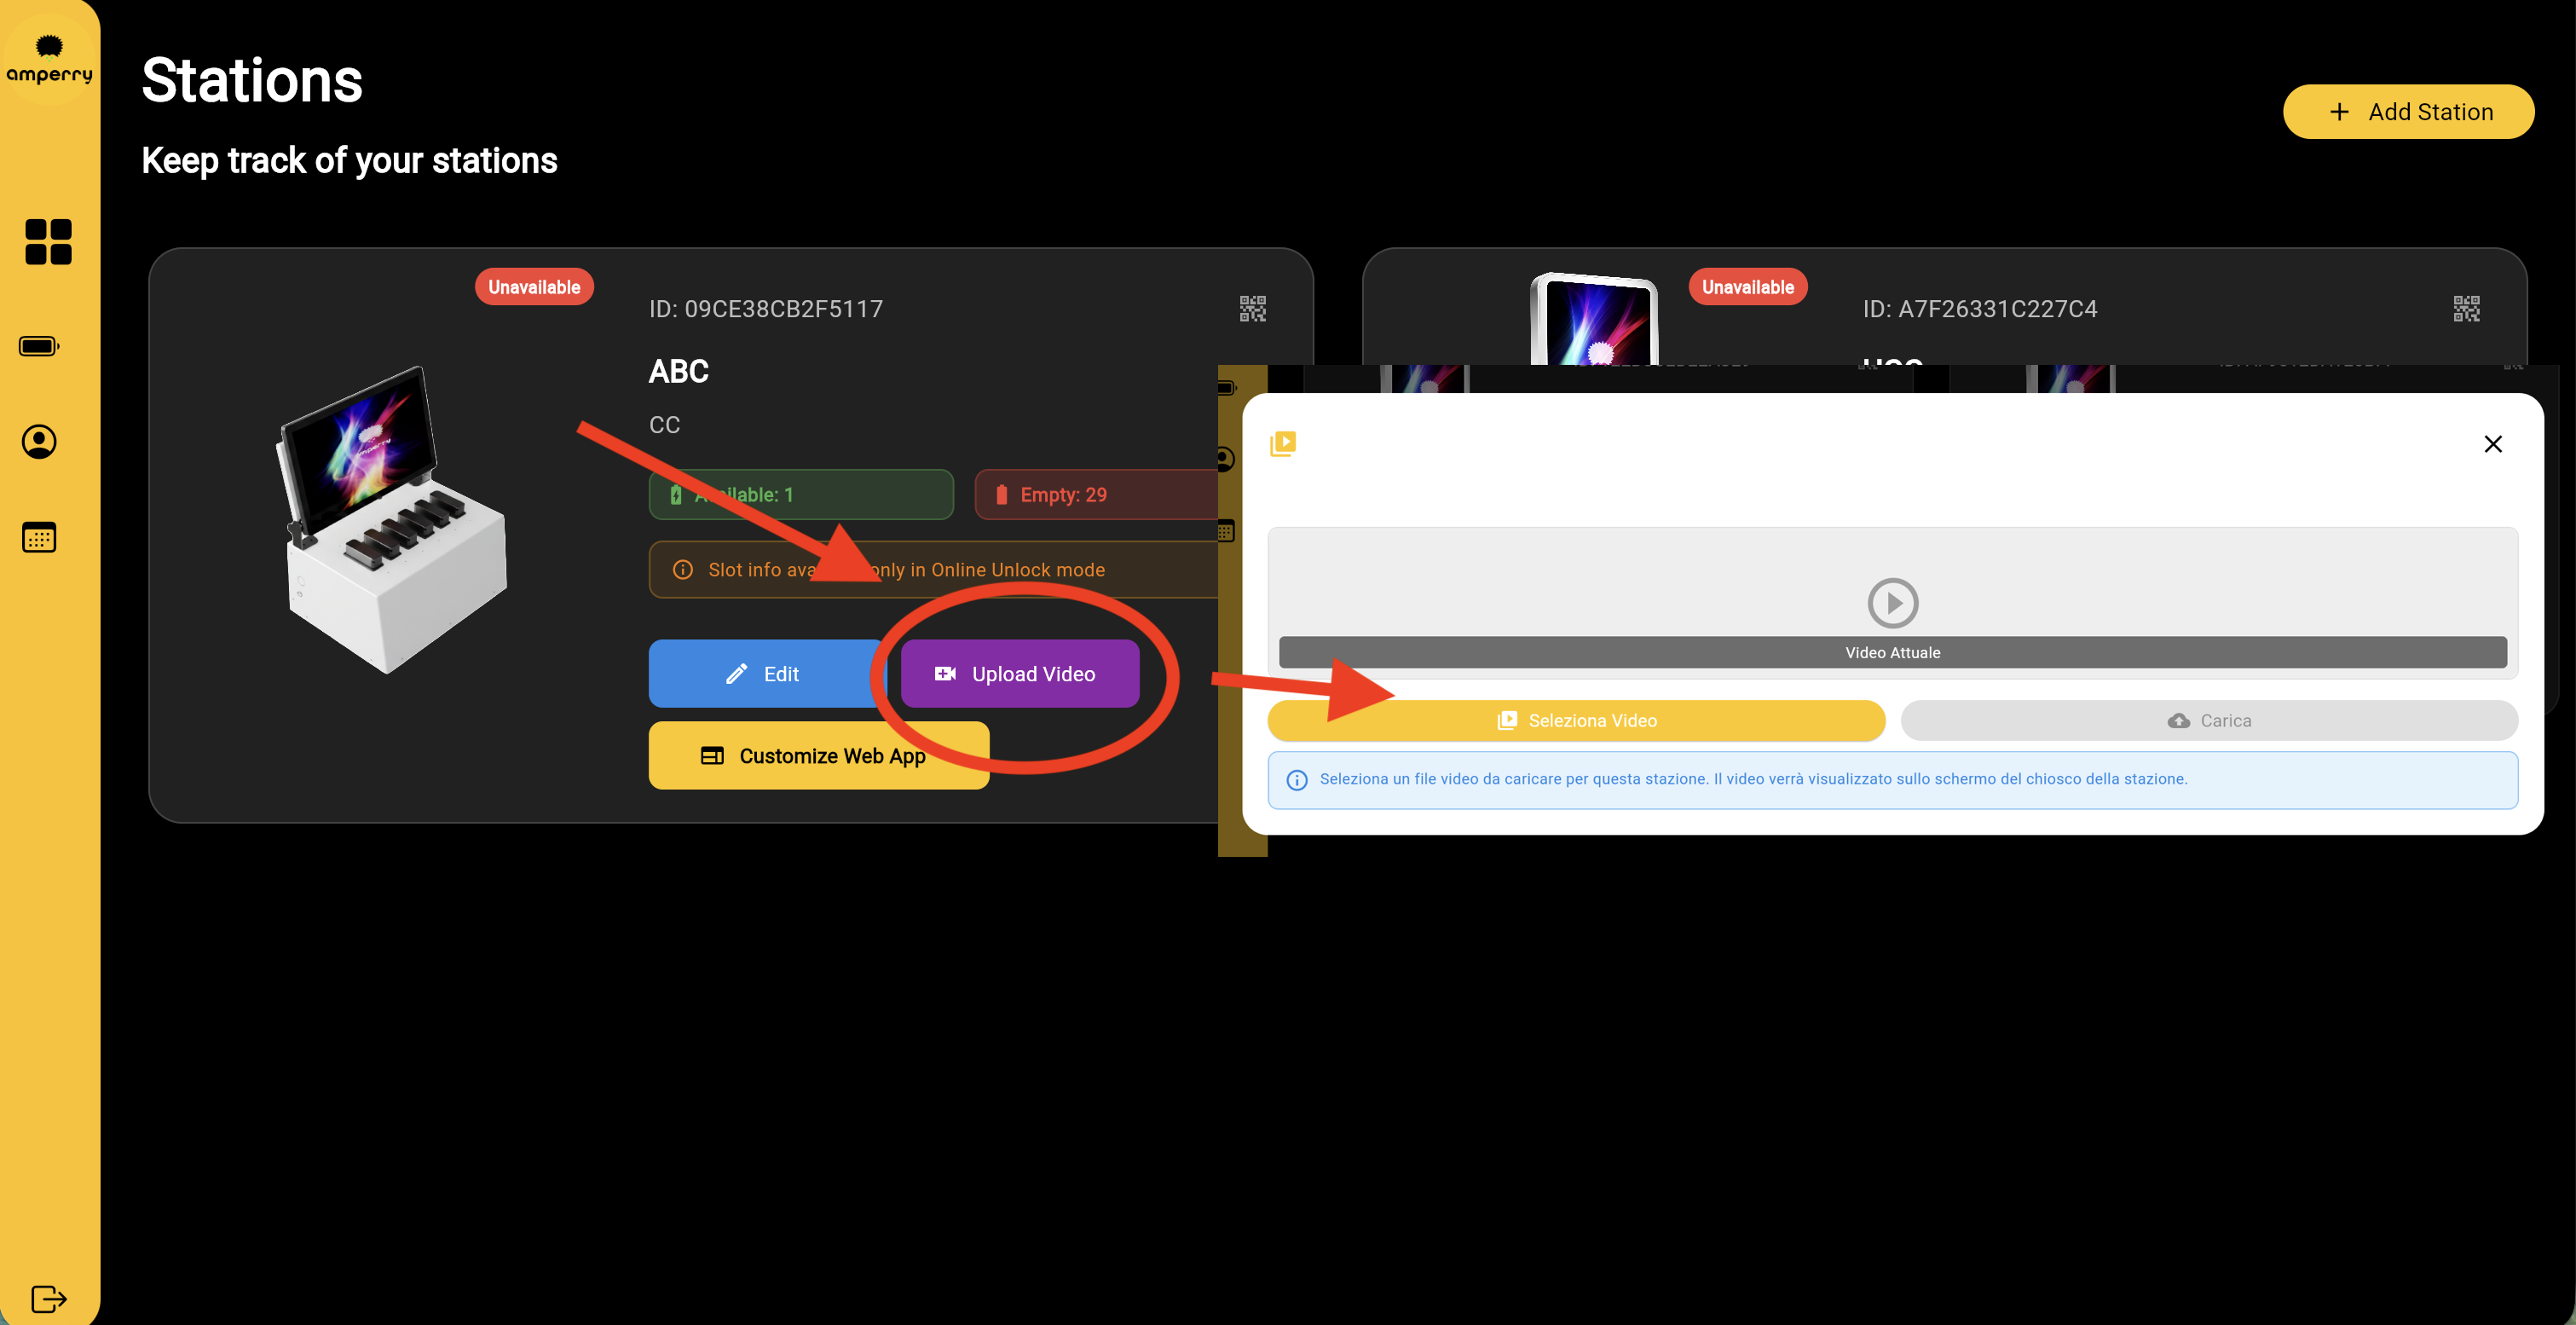
Online Video: Stream from cloud URL
- Upload videos via business portal (business.amperry.me)
- Shows QR code with instructions for uploading
-
Local Video: Use video file from device
- Upload video file directly
- Remove uploaded video
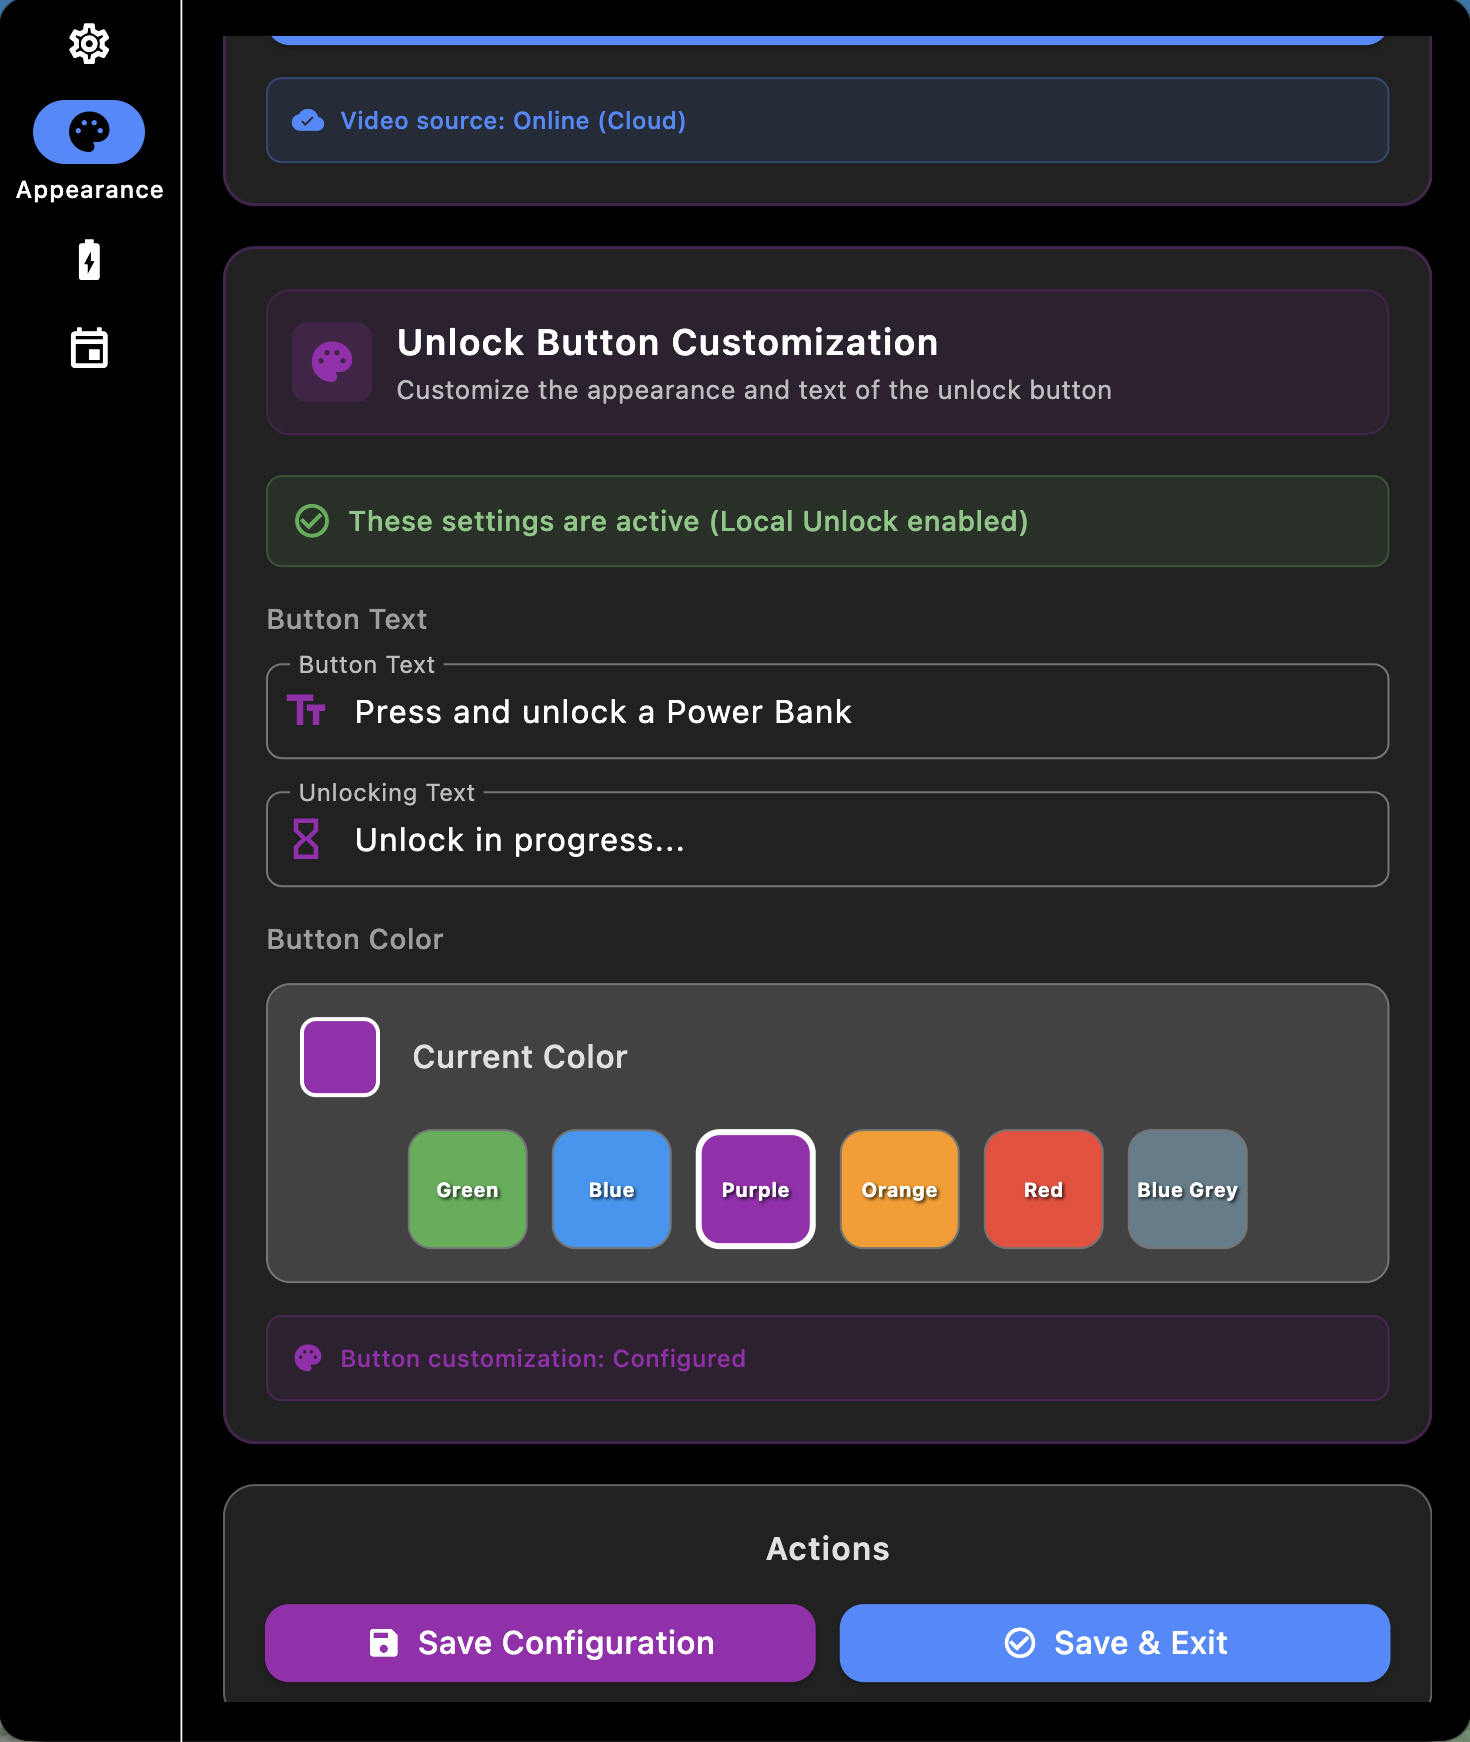
Unlock Button Customization
Configure the appearance of the unlock button (only applies when Local Unlock is enabled):
- Button Text: Text displayed on unlock button
- Unlocking Text: Text shown during unlock process
- Button Color: Choose from preset colors (Green, Blue, Purple, Orange, Red, Blue Grey)
Local Unlock Authentication
When Local Unlock mode is enabled, you can configure an authentication prompt that appears before unlocking a powerbank. This adds an extra security layer or can be used to collect user information.
Enable Authentication
Toggle "Require input before unlocking" to enable the authentication prompt.
Add screenshot: appearance-local-unlock-auth-toggle.png - Shows the toggle switch for "Require input before unlocking" in the Appearance configuration screen
Configuration Options
When authentication is enabled, configure the following:
-
Instruction Text: Custom message displayed to users explaining what they need to enter
- Example: "Enter your phone number to unlock a powerbank"
- Example: "Enter your membership code"
- Required field when authentication is enabled
-
Minimum Length: Minimum number of characters required for the input
- Set to
0for no minimum requirement - Prevents users from submitting empty or too-short codes
- Set to
-
Digits Only: Restrict input to numeric digits only
- Useful for phone numbers, membership IDs, or numeric codes
- When enabled, only numbers (0-9) can be entered
Add screenshot: appearance-local-unlock-auth-config.png - Shows the Local Unlock Authentication configuration section with all fields: Instruction Text, Minimum Length, and Digits Only toggle
How It Works
- User presses unlock button on the main kiosk screen
- Authentication dialog appears with your custom instruction text
- User enters code using the on-screen keyboard
- Validation occurs:
- Checks minimum length requirement
- Validates digits-only restriction (if enabled)
- Shows error message if validation fails
- On success: Unlock process proceeds normally
- On cancel: User can cancel and return to main screen
Add screenshot: kiosk-unlock-auth-dialog.png - Shows the authentication dialog that appears when user presses unlock button, with the custom instruction text and input field
Use Cases
- Phone Number Collection: Collect user phone numbers for rental tracking
- Membership Verification: Require membership codes before unlocking
- PIN Protection: Add PIN-based security to powerbank access
- Customer Identification: Collect customer IDs for analytics
The authentication code entered by users is not validated against any database - it's simply collected and logged. The purpose is to gather user information or add a simple access control layer.
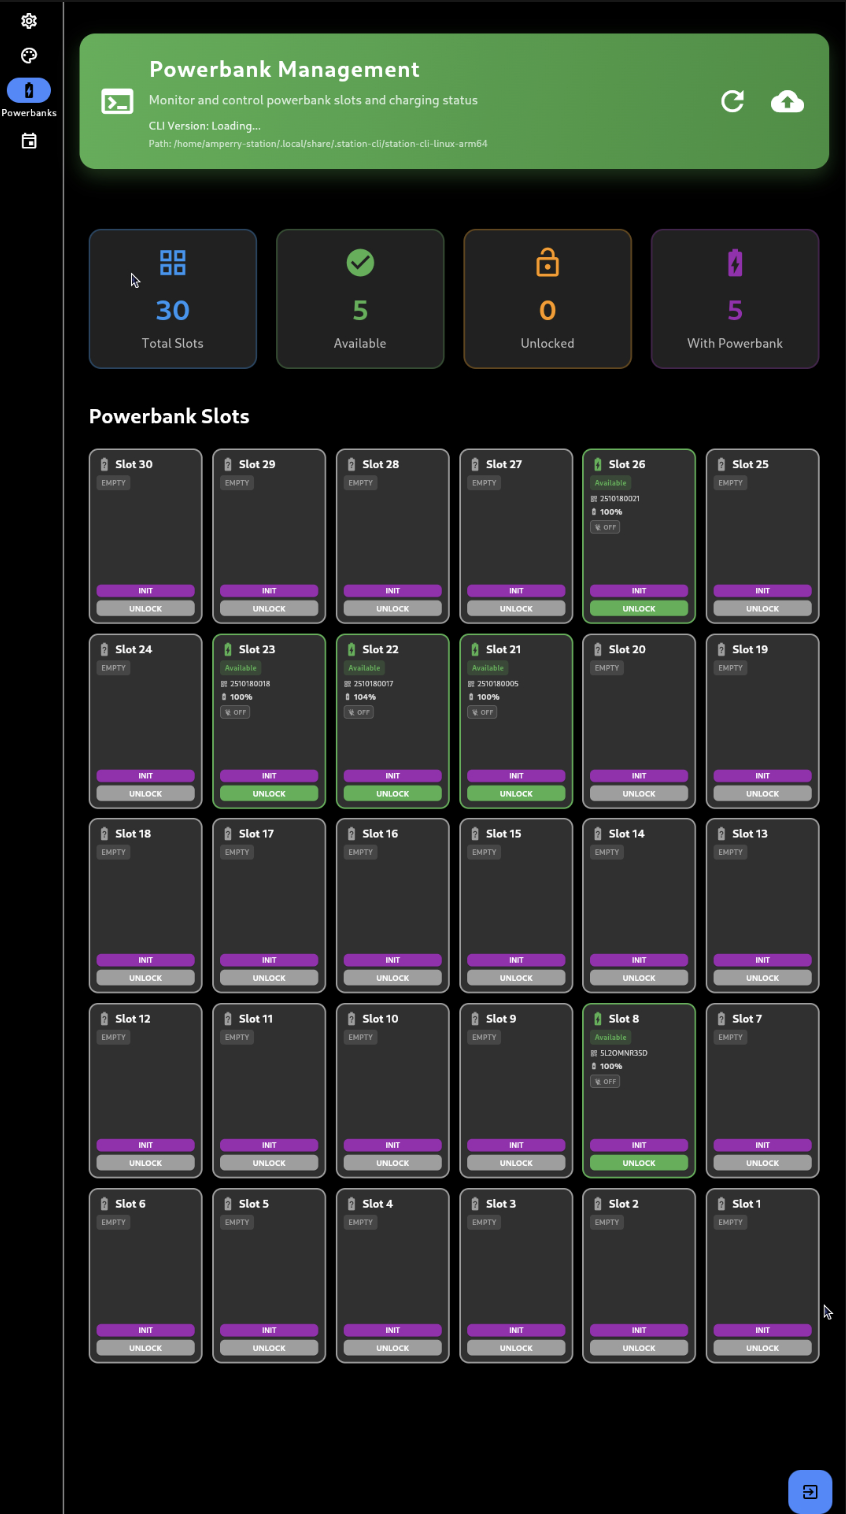
Powerbank Management
This section is currently being developed. Detailed documentation for the Powerbank Management feature will be available soon.
Purpose
Monitor and control powerbank slots, view charging status, and manage powerbanks.
Location
Settings Menu → Powerbanks (third tab)
Overview Display
The screen shows:
- Total Slots: Total number of powerbank slots (30)
- Available: Slots available for rent (charging)
- Unlocked: Slots currently unlocked
- With Powerbank: Slots containing powerbanks
Slot Monitoring
Grid Display: 30 slots arranged in a 6-column grid
Slot States:
- Available: Green - Ready for rent
- Unlocked: Orange - Currently unlocked
- With Powerbank: Blue - Powerbank inserted (charging or idle)
- Empty: Grey - No powerbank
Slot Information: Each slot displays:
- Slot number (1-30)
- Status badge
- Powerbank ID (if inserted)
- Power level percentage
- Charging indicator (CHG/OFF)
- Warning indicators (if board errors exist)
Board Error Detection
If a board is not responding:
- Red warning banner at the top
- Affected slots highlighted in red
- Displays which boards have errors
- Affected slots cannot be unlocked
Actions Available
For Each Slot:
- INIT Button: Initialize powerbank (maintenance command)
- UNLOCK Button: Unlock the slot
- Only available when slot is in valid state
- Disabled when board has errors
Refresh: Tap refresh icon in header to reload slot information
Event Management
This section is currently being developed. Detailed documentation for the Events feature will be available soon.
What it does: Create and manage business events for your powerbank stations.
Events allow you to schedule special promotions, maintenance periods, or other business activities that affect your powerbank rental stations. The full feature documentation is coming soon.
Support
Business Portal: business.amperry.me
If you need help with:
- Account access issues
- Adding new stations
- Technical problems
- Business information updates
Contact your account manager or support team.
For immediate assistance or product information, please contact your account manager or visit business.amperry.me.